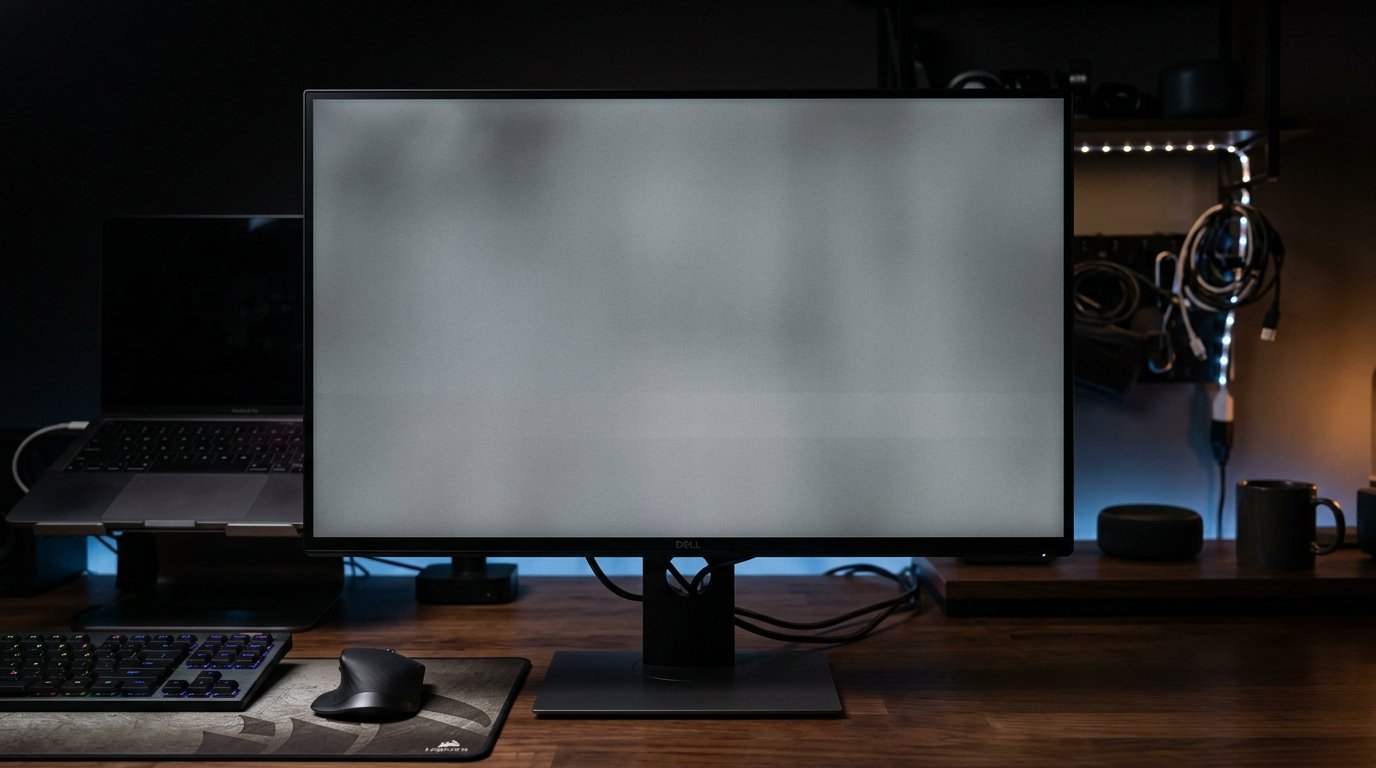
Have you ever noticed faint, cloudy patches, muddy smudges, or shadowy vertical bars on your monitor that look like dirt or grease trapped on the glass—only to find the surface completely spotless when you wipe it down? If so, you are likely witnessing one of the most widespread yet misunderstood optical defects in modern display manufacturing: the Dirty Screen Effect (DSE).
Whether you are panning the camera in a video game, watching an ice hockey or soccer match, or scrolling through light-themed web documents, Dirty Screen Effect breaks the illusion of visual depth. It makes your monitor feel like you are peering through grimy frosted glass rather than a pristine digital window. While often discussed in home-theater TV communities, DSE is equally prevalent on desktop gaming monitors, office displays, and laptop screens.
In this guide, we dive into what Dirty Screen Effect is, dissect the physics of why it happens, provide a step-by-step methodology to test your screen using gray screen patterns and camera sweeps, compare DSE against other common panel flaws, and explore practical solutions you can apply before your retailer return window closes.
What Is Dirty Screen Effect (DSE)?
Dirty Screen Effect (DSE) describes visible non-uniformity in luminance, color temperature, and diffusion across a display panel. Rather than presenting a smooth, homogeneous plane of brightness, the screen exhibits uneven patches, cloudy smears, dark corners, or vertical banding stripes that remain fixed in place while content moves beneath them.
The name "Dirty Screen Effect" comes from its signature optical characteristic: the panel appears physically stained or dusted from the inside out. In stationary scenes—such as a complex, colorful photo or a movie frame filled with detailed textures—DSE is frequently hidden by high visual frequency. However, as soon as an expansive solid or near-solid color appears (such as an open blue sky, a sheet of white paper, or a soccer field) and the camera pans across the frame, the stationary cloudy artifacts become immediately glaring.
How DSE Manifests Visually
Depending on panel manufacturing tolerances and backlight configuration, DSE can take several distinct visual forms:
- Mottled Cloudiness: Hazy, irregularly shaped dark and light blotches scattered across the middle quadrant of the display, resembling faint water stains or smoke patterns.
- Vertical or Horizontal Banding: Straight, translucent darker bands running vertically or horizontally across the panel, usually spaced evenly according to the backlight LED grid or diffuser bars.
- Vignetting (Corner Darkening): Pronounced darkening toward the outer perimeter or corners of the panel, causing white application windows to appear shadowed near the bezels.
- Dirty Window Pan Effect: The optical sensation that the picture is pristine, but you are viewing it through an uncleaned piece of glass that refuses to budge when the scene moves.
DSE vs. Backlight Bleed vs. IPS Glow vs. Vignetting
It is common for users to conflate Dirty Screen Effect with other display anomalies. However, each originates from different physical phenomena and requires different inspection methods:
- Dirty Screen Effect: Best visible on mid-tone solid backgrounds (20% to 50% gray) during camera motion. It sits in the central screen area and does not shift when you reposition your head.
- Backlight Bleed: Visible on pure black screens in dark environments. It appears as sharp, static torch-like light leaks radiating inward from the monitor edges or corners. You can analyze light leakage directly with our dedicated Backlight Bleed Test.
- IPS Glow: An optical artifact inherent to In-Plane Switching technology. It shows up as a hazy, silvery-amber sheen on dark screens that dramatically changes intensity and location as you alter your viewing angle. Read our in-depth analysis on IPS Glow vs Backlight Bleed to tell them apart.
- Uniformity Vignetting: Subtle brightness falloff specifically concentrated around the outermost edges due to diffuser light falloff, as distinct from blotchy DSE patches in the panel center.
What Causes Dirty Screen Effect on Monitors?
Unlike software rendering glitches, Dirty Screen Effect is an inherently physical imperfection rooted in the complex multi-layer construction of flat-panel displays. Understanding these internal mechanisms reveals why virtually no consumer display is 100% immune:
1. Backlight Diffuser Layer Tolerances
Behind the liquid crystal matrix of any LED-backlit LCD monitor lies a stack of optical films: light guide plates (LGP), prismatic brightness enhancement films (BEF), and diffusion sheets. The purpose of this optical sandwich is to take point-source LED lights (either edge-mounted or arrayed directly behind the panel) and disperse them into a perfectly uniform sheet of light.
In practice, microscopic variations in diffuser film thickness, minor warping, or adhesive unevenness prevent light from spreading with mathematical uniformity. Where the diffuser is slightly compressed or misaligned, fewer lumens penetrate, producing a subtle dark patch on your screen.
2. LCD Panel Tolerances & Subpixel Transmittance
The liquid crystal layer itself is sandwiched between two precision glass substrates with polarizing filters. If the cell gap (the physical spacing between the glass sheets, which is only a few microns thick) fluctuates by even a fraction of a micron across the substrate during factory lamination, the liquid crystals in those regions will transmit slightly different amounts of light at the same voltage level.
When displaying a 50% gray image, these sub-micron discrepancies prevent subpixels from reaching uniform transmittance, creating visible clouds and streaks. Review our Display Pixel Glossary for a deep dive into subpixel mechanics.
3. Chassis Tension and Bezel Pressure Points
Monitor panels are secured inside plastic or aluminum housings using metal chassis brackets and bezel clips. If assembly screws are overtightened during factory manufacturing, or if an aftermarket VESA mount applies uneven torque to the display chassis, mechanical stress pinches the panel layers together. This pressure alters optical diffusion paths, creating localized DSE clouding and edge uniformity drops.
4. Thermal Expansion and Panel Aging
High-brightness gaming displays, Mini-LED arrays, and power-dense monitors generate substantial heat during operation. As the internal optical diffuser sheets and acrylic light guides warm up, they expand at slightly different thermal coefficients than the surrounding glass and metal frame. This thermal expansion can temporarily accentuate vertical banding or wave-like luminance ripples until the panel reaches thermal equilibrium.
Step-by-Step: How to Test Your Monitor for Dirty Screen Effect
Diagnosing Dirty Screen Effect requires standardized testing environments. Testing on arbitrary desktop wallpapers or dynamic movie clips often produces false positives or masks real defects. Follow this five-step diagnostic procedure:
Step 1: Clean Your Screen & Set Proper Room Lighting
Before launching software diagnostics, eliminate physical surface contamination. Fingerprints, airborne grease, and micro-dust particles frequently mimic optical panel clouding:
- Power off your monitor and let the panel cool down completely.
- Gently wipe the screen surface using a dry, clean microfiber cloth. Never use harsh glass cleaners, alcohol, or ammonia solutions, which damage anti-glare coatings.
- If stubborn smudges remain, lightly dampen the microfiber cloth with distilled water or an electronics-certified screen cleaner.
- Dim your room lighting to moderate ambient levels. Avoid harsh overhead ceiling lights or direct sunlight bouncing off the anti-glare coating, as specular reflections conceal subtle luminance gradients.
Step 2: The Full-Screen 50% Neutral Gray Screen Test
The definitive benchmark for Dirty Screen Effect is the 50% neutral gray screen test (RGB: 128, 128, 128). Why is gray the gold standard rather than white or black?
- On a pure white screen (RGB: 255, 255, 255), the human retina is saturated with high luminance, triggering pupil constriction that washes out subtle tonal shifts.
- On a pure black screen (RGB: 0, 0, 0), liquid crystals are closed, which highlights backlight bleed but masks internal diffuser inconsistencies.
- On a 50% gray screen, the human visual system operates at peak contrast sensitivity (Weber-Fechner law). Subtle 2% to 5% luminance drops immediately stand out as distinct dark smudges, dirty streaks, or vertical bars.
Launch our free Grayscale & Gradient Test, press F11 to enter true fullscreen mode, and inspect the middle 50% gray pattern. Scan your eyes slowly from left to right across the center third of the panel.
Step 3: The Horizontal Panning Motion Test
Because the human eye is vastly more sensitive to stationary artifacts against moving backgrounds, testing with camera motion is essential:
- Open a high-definition video of an ice hockey match, a football game on a green field, or a slow camera pan across a clear overcast sky (easily found on YouTube by searching "DSE hockey panning test 4K").
- Set the video to fullscreen at native resolution and maximum frame rate.
- Keep your eyes fixed on the center of the display while the camera moves horizontally.
- If you see stationary, translucent vertical streaks or cloudy patches that appear "glued" to the screen glass while the white ice or green grass scrolls smoothly beneath them, your display has active Dirty Screen Effect.
Step 4: Full Grayscale Uniformity Evaluation (5% to 75%)
DSE can vary depending on brightness levels. Evaluate multiple grayscale stops:
- 5% and 10% Near-Black Gray: Critical for OLED, QD-OLED, and VA panels. Near-black patterns reveal thin vertical banding lines that commonly plague self-emissive panels.
- 20% to 30% Dark Gray: Highlights diffuse clouding across IPS gaming monitors and Mini-LED local dimming zones.
- 50% Mid Gray: The primary standard for overall panel uniformity and diffuser sheet consistency.
- 75% and 85% Light Gray: Highlights edge vignetting, corner shadow falloff, and color temperature warmth splits (e.g., left side running warm yellowish, right side running cool blue).
You can run through all these levels automatically using our complete Screen Test Diagnostic Suite.
Step 5: Camera Documentation Without Moiré
If you suspect severe DSE and plan to submit a warranty claim or return request to the manufacturer, capturing photographic proof is critical. However, smartphone camera sensors often exaggerate screen flaws or introduce rainbow moiré patterns:
- Position your camera or phone squarely perpendicular to the center of the screen at eye level (at least 3 to 4 feet away) to avoid off-axis viewing angle distortion.
- Switch your camera app to Pro / Manual Mode.
- Lock exposure, set ISO to a low value (ISO 100 or 200), and manually adjust shutter speed so the 50% gray screen matches what your eyes perceive in person.
- Set manual focus slightly off the pixel grid (or stand further back and zoom optically) to prevent moiré grid interference.
- Capture both stationary photos and a short video clip of the panning hockey test.
Which Display Types Are Most Vulnerable to DSE?
Every display technology interacts differently with screen uniformity challenges. Here is how common panel types compare:
IPS (In-Plane Switching) Displays
IPS panels are widely prized for their wide 178-degree viewing angles and superior color fidelity. Because viewing angles are wide, IPS monitors suffer less from angular color shifts that disguise or distort DSE. However, edge-lit IPS gaming monitors frequently suffer from subtle cloudiness and corner vignetting caused by multi-sheet optical diffusers. Severe vertical banding is rare on IPS, but cloudy patches in the central viewing area are common.
VA (Vertical Alignment) Displays
VA panels deliver exceptional native static contrast ratios (often 3000:1 to 5000:1), making them popular for immersive gaming and movies. However, VA liquid crystals have narrower viewing angles. Even sitting dead-center in front of a wide 32-inch or curved VA monitor, subtle shifts in your line of sight can cause gamma shifts across the edges. This gamma shift can magnify perceived Dirty Screen Effect, particularly along vertical bands.
OLED & QD-OLED Panels (Near-Black Banding)
OLED and QD-OLED displays do not utilize backlights, light guides, or diffuser sheets; each microscopic subpixel emits its own light independently. Consequently, OLED displays exhibit virtually zero traditional backlight DSE on 50% gray or white backgrounds. Full-screen brightness uniformity is pristine.
However, OLED technology has its own variation: near-black vertical banding. On very dark 5% and 10% gray test slides, subtle vertical lines may appear due to slight current variations across thin-film transistor (TFT) backplanes. In most cases, these bands smooth out after running automatic pixel refresh / compensation cycles. For more details on OLED panel health, see our guide on OLED Burn-In vs Image Retention and our comparison between QD-OLED vs WOLED displays.
Mini-LED & Full-Array Local Dimming (FALD)
Mini-LED monitors employ hundreds or thousands of tiny local dimming LEDs behind the LCD layer. While this delivers HDR highlights and near-OLED black levels, it introduces a unique uniformity challenge: zone grid DSE. As moving objects cross across dimming zones, the transition between lit and unlit zones can create a faint checkerboard or grid-like pattern behind uniform backgrounds.
Can You Fix or Reduce Dirty Screen Effect?
Because Dirty Screen Effect is a hardware characteristic rooted in the physical layers of the panel, it cannot be 100% eliminated through software calibration or firmware updates. You cannot "download a fix" for a misaligned diffuser sheet. However, you can significantly diminish its real-world prominence through systematic adjustments:
1. Optimize Backlight Brightness and Contrast
Excessive brightness pushes backlight LEDs to their maximum output, amplifying optical unevenness through diffuser sheets. Similarly, setting contrast too high crushes highlight gradation, exaggerating tonal transitions:
- Lower your monitor's OSD brightness from 100% down to a comfortable 40% to 60% (typically 120 to 160 nits for indoor office environments).
- Ensure contrast is set to its factory default (usually 50% or 75%) to avoid digital clipping.
- Consult our tutorial on calibrating monitor colors on Windows & macOS and fixing color banding issues.
2. Tune Local Dimming & Energy Saving Modes
If you own a Mini-LED or FALD monitor, test how different local dimming presets affect solid gray slides. Setting local dimming to "Medium" or "Low" often smooths out zone boundary luminance steps compared to aggressive "High" presets. Additionally, disable "Dynamic Contrast" and ambient light sensor adjustments in your monitor's On-Screen Display, as erratic real-time adjustments make DSE far more jarring.
3. Check Bezel Pinch Points and VESA Screw Tension
Over-torqued mounting hardware is a frequent cause of localized uniformity drops:
- If your monitor is mounted on an aftermarket monitor arm or wall mount, verify that the four VESA screws are snug but not overtightened. Hand-tighten them with a manual screwdriver rather than an electric tool.
- Carefully inspect the outer plastic bezels. If a corner clip was misaligned during shipping, gently pressing the bezel frame can occasionally seat the snap clip properly and relieve localized pressure on the diffuser layer.
4. Allow Thermal Settling and Panel Break-In
Brand new monitors straight out of the box frequently exhibit slight optical tension from factory packing materials and cold warehouse storage. Running the monitor through normal usage for 40 to 80 hours allows internal adhesive bonds and acrylic layers to settle through natural heating and cooling cycles. On OLED screens, running 2 to 3 automatic pixel cleaning cycles often dramatically reduces near-black vertical banding lines.
5. When to Return or RMA Your Monitor
Every monitor panel undergoes factory quality control, but acceptable tolerance margins (often called the "panel lottery") vary wildly. Here is how to decide whether to keep or return your screen:
- Acceptable Minor DSE (Keep): Very faint shading that is only detectable on static 50% gray synthetic test slides, completely invisible in everyday gaming, video editing, and web browsing. Virtually all LCD panels have some baseline trace of this.
- Unacceptable Severe DSE (Return / Exchange): Stark vertical bands slicing across the middle third of the screen, dark clouding that distracts during casual sports viewing or web scrolling, or corner vignetting exceeding 25% luminance drop.
Always inspect your screen within the retailer's no-questions-asked return window (typically 14 to 30 days). Retailer exchanges are fast, painless, and do not require proving a hardware defect. Once the return window expires, manufacturer warranty claims require proving that the uniformity flaw exceeds manufacturer technical specifications. For a comprehensive new display evaluation plan, consult our New Monitor Screen Checklist.
Display Defect Comparison: DSE vs. Bleed vs. Glow vs. Dead Pixels
To help you accurately identify what is happening on your screen, reference this comprehensive comparison matrix:
| Defect Type | Visual Appearance | Best Test Pattern | Viewing Angle Dependency | Is It Fixable? |
|---|---|---|---|---|
| Dirty Screen Effect (DSE) | Cloudy smudges, hazy patches, or vertical banding across panel | 20% – 50% Neutral Gray screen; horizontal panning video | Static (stays fixed to the same physical spot) | Partially mitigable via brightness & bezel tension; exchange if severe |
| Backlight Bleed | Sharp golden or white light spilling inward from edges | Pure Black (RGB 0,0,0) in a darkened room | Static (remains at edges regardless of angle) | Loosen tight chassis screws, lower backlight, or exchange panel |
| IPS Glow | Silvery, pale sheen radiating across dark corners | Pure Black (RGB 0,0,0) in dark or dim room | Dynamic (shifts, moves, and disappears as you move your head) | Inherent to IPS optics; adjust viewing distance, angle, and bias lighting |
| Dead Pixel | Sharp, pinpoint microscopic dark dot (subpixel transistor off) | Full-screen solid White, Red, Green, or Blue slides | Microscopic; fixed to exact subpixel coordinate | Permanent hardware failure; test with our Dead Pixel Test |
| Stuck Pixel | Bright, energized colored dot permanently stuck on Red, Green, or Blue | Solid Black background test | Microscopic; fixed to exact coordinate | Often fixable via high-speed color flasher tools (Stuck Pixel Test) |
Test Your Screen for DSE & Pixel Flaws Now
Launch our high-precision, zero-download browser diagnostic suite to evaluate gray screen uniformity, identify stuck subpixels, and inspect panel health.
Frequently Asked Questions
What is Dirty Screen Effect (DSE) on a monitor?
Dirty Screen Effect (DSE) is a display defect characterized by uneven luminance, hazy clouding, or faint vertical streaks across a screen panel. It makes the monitor glass appear perpetually smudged or dusty from behind the surface, most visibly during camera pans or uniform solid-color backgrounds.
How do you test for Dirty Screen Effect?
The most effective method is running a full-screen neutral gray screen test (specifically between 20% and 50% gray) using our Grayscale Test, and viewing panning video content such as hockey, soccer, or sky sweeps. Gray tones reveal diffusion inconsistencies and luminance fluctuations far better than pure white or pure black.
Is Dirty Screen Effect permanent, or can it be fixed?
Because DSE is rooted in physical panel layering, backlight diffuser inconsistencies, and factory manufacturing tolerances, it cannot be completely eliminated through software calibration. However, adjusting backlight intensity, tuning contrast, loosening tight bezel screws, and enabling local dimming can significantly reduce its real-world visibility.
Will monitor manufacturers replace a screen with Dirty Screen Effect?
Most display manufacturers consider minor DSE within normal production tolerances. However, if your display exhibits severe dark blotches, stark vertical banding across center viewing zones, or extreme luminance deviation exceeding 20%, it often qualifies for a replacement within the standard retailer return window or manufacturer warranty.
Why is Dirty Screen Effect more noticeable during camera panning?
Human vision relies on motion contrast to detect spatial variations. When an on-screen scene moves horizontally while the stationary panel imperfections remain in place, your eyes immediately register the stationary dark streaks relative to the moving background, creating an illusion of grime on the glass.
How is Dirty Screen Effect different from Backlight Bleed or IPS Glow?
Backlight bleed appears as harsh golden or white light spilling inward along panel edges on dark screens. IPS glow is an angle-dependent optical sheen that shifts when you move your head. Dirty Screen Effect, by contrast, sits static across the central viewing area and becomes visible on medium-gray, beige, or white solid backgrounds.
Final Thoughts & Screen Health Recommendations
Dirty Screen Effect is a reality of modern display manufacturing. Almost every LCD monitor exhibits some microscopic degree of luminance variation when subjected to rigorous synthetic test patterns. The deciding factor is not whether your display is mathematically flawless under laboratory scrutiny, but whether the non-uniformity interferes with your daily gaming, creative workflows, or productivity.
By conducting a standardized 50% neutral gray screen test and a horizontal panning video evaluation as soon as your display arrives, you can immediately determine whether your unit is a keeper or a candidate for a swift exchange. For more display testing insights, explore our full library of display diagnostics articles and test your hardware with our suite of free tools on DeadPixelTests.com.