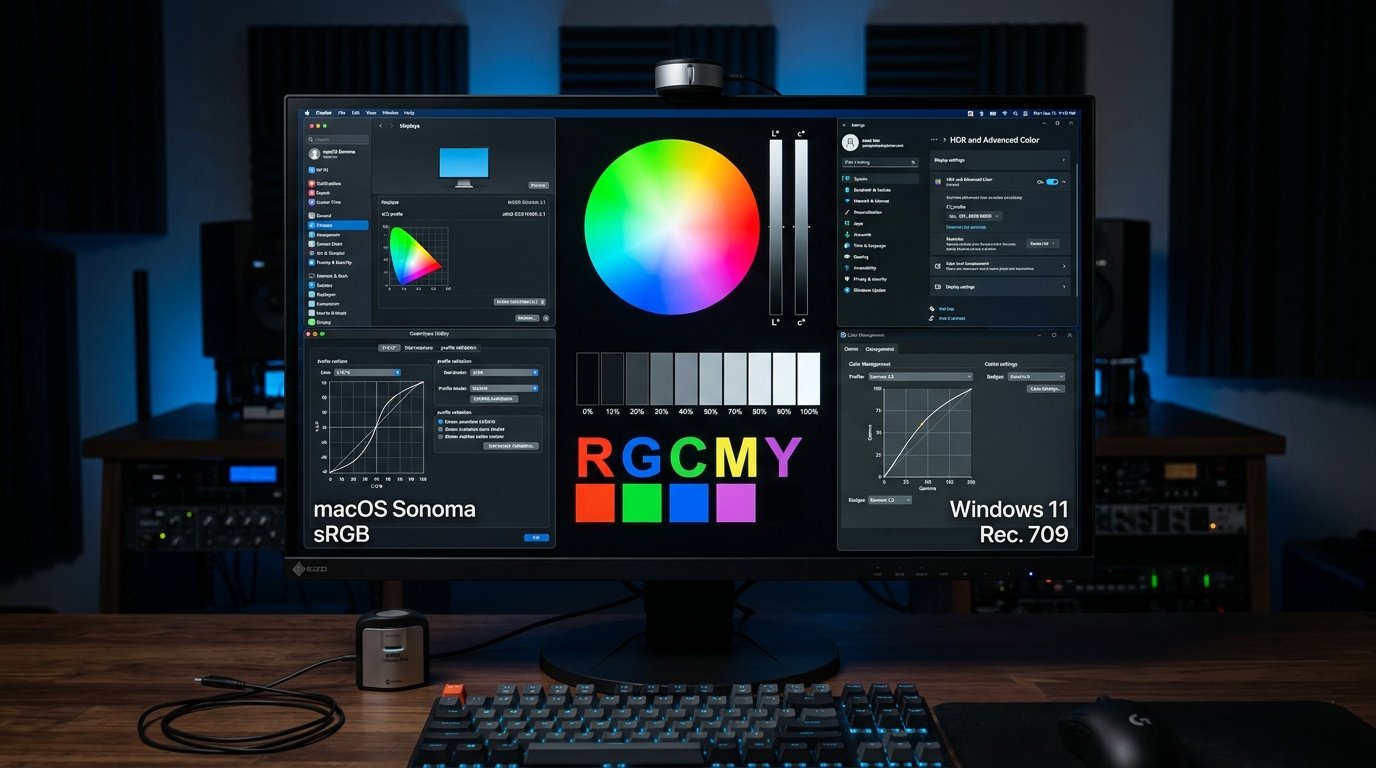
Have you ever edited a photo on your computer only to discover that it looks completely different on your smartphone? Or noticed that whites on your screen appear aggressively cold and blue, skin tones look unnaturally sunburned, or dark shadows blend into murky, washed-out blocks of gray? When colors look distorted across different devices or fail to match printed proofs, the root cause is almost always an uncalibrated monitor or a misconfigured ICC color profile.
Every computer monitor leaves the manufacturing line with unique panel variations, backlight characteristics, and factory firmware presets. By default, most consumer and gaming displays are tuned for showroom floor appeal: pushed to peak brightness with cool 7500K+ color temperatures and exaggerated contrast curves designed to stand out under bright store lighting. While exciting for casual gaming, these aggressive factory presets distort creative workflows, cause severe eye fatigue during long desk sessions, and prevent you from seeing digital content the way creators intended.
Whether you are a digital photographer, video colorist, graphic designer, or simply someone who wants clean, natural, and accurate screen colors, proper monitor calibration is the foundation of digital imaging. This comprehensive, step-by-step guide explains the physics of display calibration, demystifies ICC color management profiles, and walks you through exact calibration workflows on Windows 11 and macOS.
Table of Contents
- 1. What Is Monitor Color Calibration?
- 2. What Is an ICC Profile?
- 3. Before You Calibrate Your Monitor
- 4. How to Calibrate in Windows 11
- 5. How to Install ICC Profiles in Windows 11
- 6. How to Calibrate on macOS
- 7. How to Install ICC Profiles on macOS
- 8. Software vs. Hardware Calibration
- 9. Common Calibration Mistakes
- 10. How Often Should You Calibrate?
- 11. How to Check Your Monitor After Calibration
- 12. Frequently Asked Questions
1. What Is Monitor Color Calibration?
Display calibration is the process of adjusting a monitor's physical and digital operating parameters to match an established colorimetric standard. Rather than letting the monitor display subjective, arbitrary shades of light, calibration aligns your panel with internationally recognized specifications such as sRGB, Display P3, Adobe RGB, and Rec. 709.
When calibrating a screen, five foundational technical attributes are aligned:
1. White Point & Color Temperature
Measured in Kelvin (K). The global creative standard is D65 (6500K), which replicates average midday daylight. Uncalibrated screens frequently sit above 7500K–9000K, creating an unnatural blue tint.
2. Display Gamma (Tone Curve)
The mathematical relationship between input signal voltage and output screen luminance. Standard SDR computing targets Gamma 2.2, ensuring linear progression from deep blacks to pure highlights without crushing shadows.
3. Target Luminance (Brightness)
Measured in candelas per square meter (cd/m² or nits). For color-accurate SDR photo and video workflows in controlled indoor lighting, target luminance is calibrated between 100 and 120 cd/m².
4. Black Level & Contrast Ratio
Setting the black point ensures that Level 0 (pure black) remains dark without crushing Levels 1 through 16 into indistinguishable darkness, preserving critical shadow texture.
Why do factory settings fail to meet these standards? Manufacturers design default monitor profiles for brightly illuminated electronics retail environments. To catch consumer eyes, panels are set to maximum brightness, high sharpness filters, and exaggerated blue saturation. When you bring that monitor home, these aggressive settings distort color judgment. Calibrating your monitor tames these artificial enhancements, restoring a neutral, authentic window into your digital media.
2. What Is an ICC Profile?
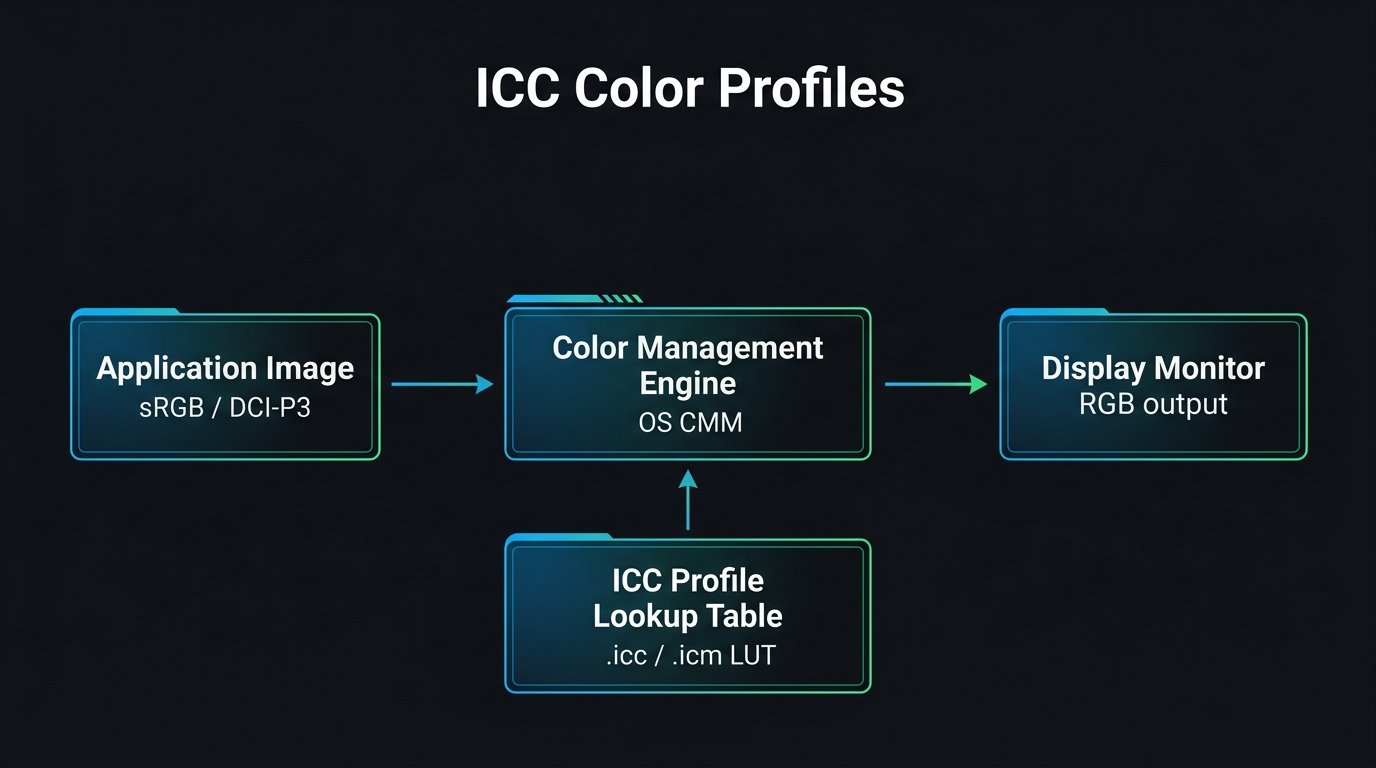
An ICC profile is a standardized data file defined by the International Color Consortium that describes the color reproduction capabilities and physical limitations of a display, printer, or camera. On computer systems, ICC profiles carry either the .icc or .icm file extensions (both formats are functionally identical and fully interchangeable).
Think of an ICC profile as a bilingual translator between software and hardware. When you open a digital photograph in Adobe Photoshop, Figma, or a web browser, the image file contains digital RGB coordinates (e.g., R: 240, G: 80, B: 50) mapped in a standard color space such as sRGB. However, your physical monitor panel has its own physical color gamut, backlight chemistry, and phosphor response. The operating system's Color Management Module (CMM)—Windows Color System (WCS) on Windows or ColorSync on macOS—consults the active ICC profile to translate those digital coordinates into the exact electrical signals required to produce the intended color on your specific panel.
It is vital to distinguish between calibration and profiling:
Calibration is the physical act of adjusting your monitor's hardware gains (brightness, contrast, RGB gain sliders in the monitor's On-Screen Display menu) to bring it into a known baseline state (e.g., 6500K white point and 120 cd/m²).
Profiling is the process of measuring the calibrated display with an optical instrument and generating an ICC profile file that records the remaining gamut boundaries and tone response curves for the operating system.
Why You Should Avoid Downloading Generic Online Profiles
A common mistake among PC users is searching online forums or review sites for ICC profiles made for their monitor model. While well-intentioned, this practice frequently worsens color accuracy. Two identical monitors manufactured in the same factory often have different sub-panel production batches, slight differences in LED backlight phosphor coating, and component age drift. Furthermore, an ICC profile recorded on another user's graphics card at specific hardware brightness settings will produce incorrect gamma tracking, black crush, or severe color banding when loaded onto your screen. For genuine accuracy, calibration profiles must be tailored to your individual display.
3. Before You Calibrate Your Monitor: Pre-Calibration Checklist
Before launching calibration wizards or placing a colorimeter sensor against your screen, preparing your hardware and physical workspace is essential. Skipping these preliminary steps will compromise your calibration results:
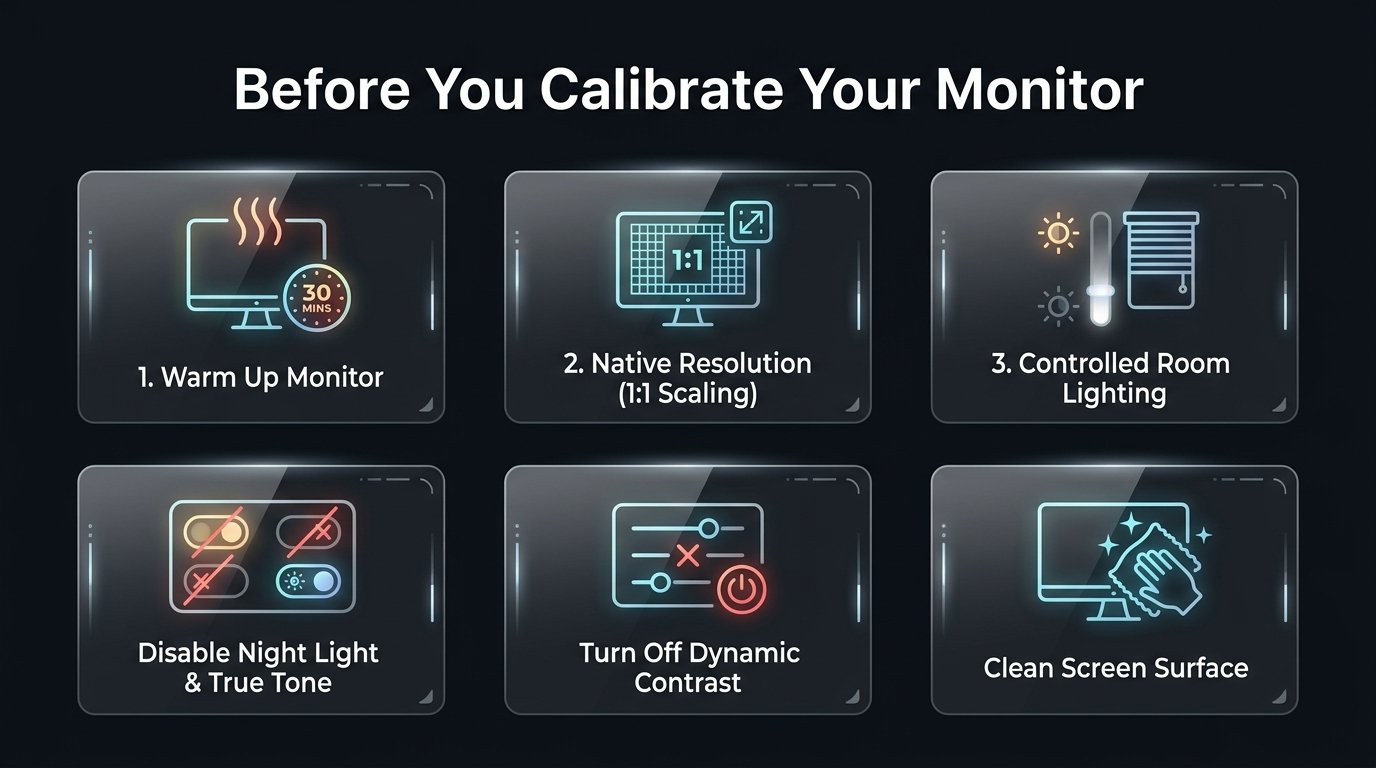
- 1. Warm Up the Display for 30 Minutes: CCFL backlights and modern W-LED/mini-LED panels experience significant color and luminance shift during their first 20 to 30 minutes of operation. Let your screen reach thermal equilibrium before making any adjustments.
- 2. Confirm Native Resolution and 1:1 Pixel Scaling: Check that your operating system is outputting the monitor's native physical resolution. Non-native resolutions cause subpixel interpolation and blur text edges. Verify your display scaling with our free Screen Resolution Test.
- 3. Control Room Ambient Lighting: Avoid calibrating in direct sunlight, under halogen lamps, or near fluctuating window light. Use indirect, dim neutral lighting (approx. 5000K–6500K) to avoid optical glare and eye pupil constriction.
- 4. Disable Night Light, Night Shift & True Tone: Automated blue-light filters (Windows Night Light, macOS Night Shift, Apple True Tone, f.lux) dynamically shift screen chromaticity toward amber. Disable all automated color-temperature adjustments.
- 5. Turn Off Dynamic Contrast & Eco Sensors: Open your monitor's physical On-Screen Display (OSD) menu and disable Dynamic Contrast Ratio (DCR), Ambient Light Sensors, and Black Equalizer/Boost modes. These features dynamically alter gamma based on scene content, invalidating static calibration.
- 6. Clean Your Screen Surface: Dust specks, skin oils, and fingerprint smudges scatter light. Clean the panel using a dry microfiber cloth before running diagnostic patterns. Learn proper techniques in our Monitor Screen Inspection Checklist.
- 7. Evaluate SDR vs. HDR Mode: For standard color-critical workflows (sRGB, Adobe RGB, web design, print), ensure HDR is toggled OFF in Windows/macOS. Calibrating in Standard Dynamic Range provides predictable gamma 2.2 tracking.
4. How to Calibrate Monitor Colors in Windows 11
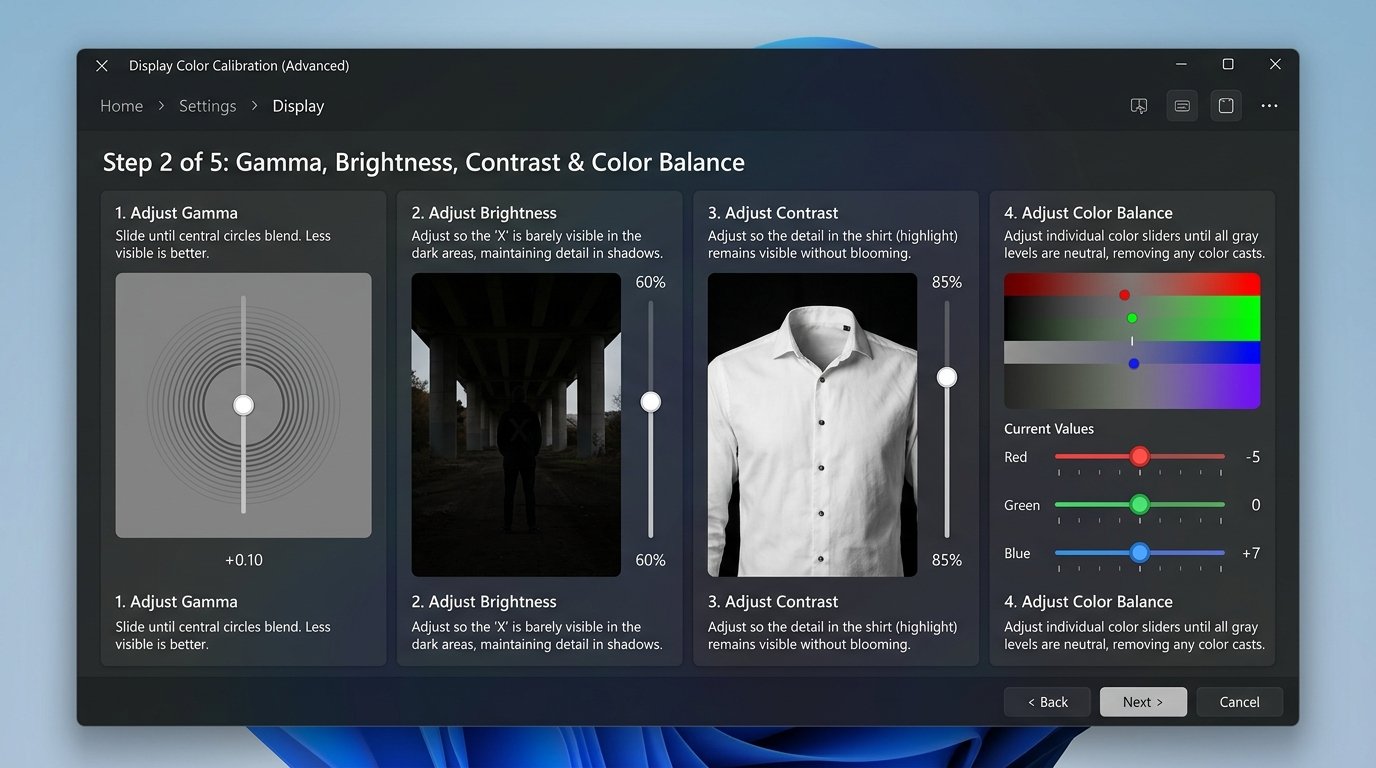
Windows 11 includes a built-in visual calibration tool called Display Color Calibration (DCCW). While software-based calibration relies on your visual perception rather than optical sensors, it provides a dramatic improvement over uncalibrated factory showroom presets.
Step 1 — Open Display Color Calibration
Press Win + S, type Calibrate display color, and press Enter. Alternatively, press Win + R, type dccw.exe, and click OK. If you use multiple monitors, drag the wizard window onto the display you intend to calibrate before clicking Next.
Step 2 — Adjust Gamma
Gamma controls the transition curve between black and white. The wizard will show an example of correct, low, and high gamma, followed by an adjustment slider over a pattern of circles. Move the vertical slider until the small center dots blend smoothly with the surrounding striped circles, making the dots as invisible as possible. If the center dots appear darker than the background, gamma is too low; if they appear brighter, gamma is too high.
Step 3 — Adjust Brightness (Black Point)
The wizard displays a portrait of a person in a dark suit against an underexposed background with a faint letter 'X'. Locate the physical Brightness control in your monitor's hardware OSD menu. Adjust brightness until you can barely distinguish the suit from the dark background, while ensuring the 'X' remains faintly perceptible. If the 'X' vanishes entirely, shadow detail is being crushed into black. If the background turns milky gray, brightness is too high.
Step 4 — Adjust Contrast (White Point)
Contrast sets the white level and highlight clipping ceiling. The wizard displays an image of a person wearing a white dress shirt with visible fabric folds and buttons against a bright background. Using your monitor's OSD Contrast button, increase contrast until the shirt is bright white while keeping the subtle wrinkles and button seams distinct. If the shirt loses all texture into a solid block of blown-out white, lower the contrast control slightly.
Step 5 — Adjust Color Balance (RGB Neutrality)
The color balance step allows you to eliminate unwanted color casts (such as yellow, green, or magenta tints) from gray tones. The wizard presents neutral gray gradient bars with three individual sliders: Red, Green, and Blue. Examine the gray bars carefully under neutral lighting. If the gray bars lean warm or reddish, decrease the Red slider by one or two notches. If they look greenish or bluish, fine-tune the corresponding channels until all gray steps appear completely neutral.
Step 6 — Compare Previous vs. Current Calibration
On the final comparison page, click the Previous calibration and Current calibration buttons to toggle between your old display settings and the newly adjusted profile. You will immediately notice that the new calibration eliminates harsh color casts and provides more natural contrast.
Step 7 — Save the Calibration & ClearType Text Tuning
Click Finish. Check the box labeled Start ClearType Tuner when I click Finish to optimize Windows subpixel font rendering for your panel's RGB subpixel layout.
5. How to Install an ICC Profile in Windows 11
If your monitor manufacturer provides an official color profile driver package, or if you have generated a custom profile with a hardware colorimeter, follow these steps to install and set it as default in Windows 11:
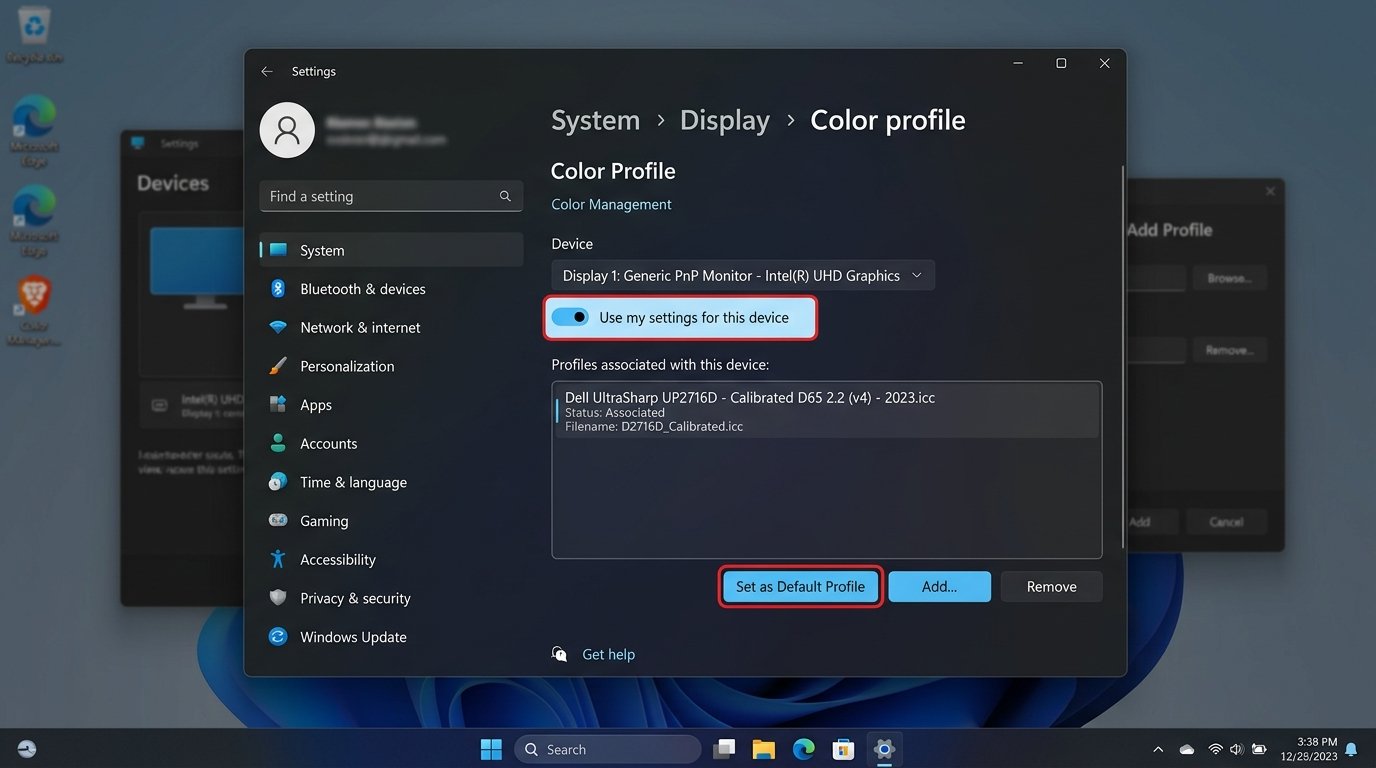
Windows 11 ICC Profile Installation Steps:
- Locate your downloaded
.iccor.icmfile in File Explorer. Right-click the file and select Install Profile. Windows copies the file toC:\Windows\System32\spool\drivers\color. - Press Win + R, type
colorcpl, and press Enter to launch the classic Color Management applet. - In the Device dropdown at the top, select your target monitor (e.g., Display 1: Generic PnP Monitor or your monitor's brand name).
- Check the checkbox labeled Use my settings for this device.
- Click the Add... button at the bottom left.
- Under ICC Profiles, scroll through the list, select your newly installed profile, and click OK.
- Highlight the added profile in the list and click the Set as Default Profile button.
- Switch to the Advanced tab and confirm that Device profile is set to System default.
- Click Close. Restart your system or sign out and back in to ensure all running graphics pipelines apply the updated profile.
Monitor manufacturer ICC profiles provided with drivers are generic profiles created for the average panel during initial mass production. They are helpful for declaring the monitor's native color space to Windows, but they do not account for individual panel wear, backlight aging, or your specific room lighting. For critical color work, hardware-calibrated custom profiles remain the gold standard.
6. How to Calibrate Monitor Colors on macOS
Apple macOS utilizes a robust, system-wide color management engine called ColorSync. Unlike Windows, which historically required external color management within individual creative applications, macOS automatically handles color space conversions across the entire operating system, Safari, QuickTime, and desktop applications.
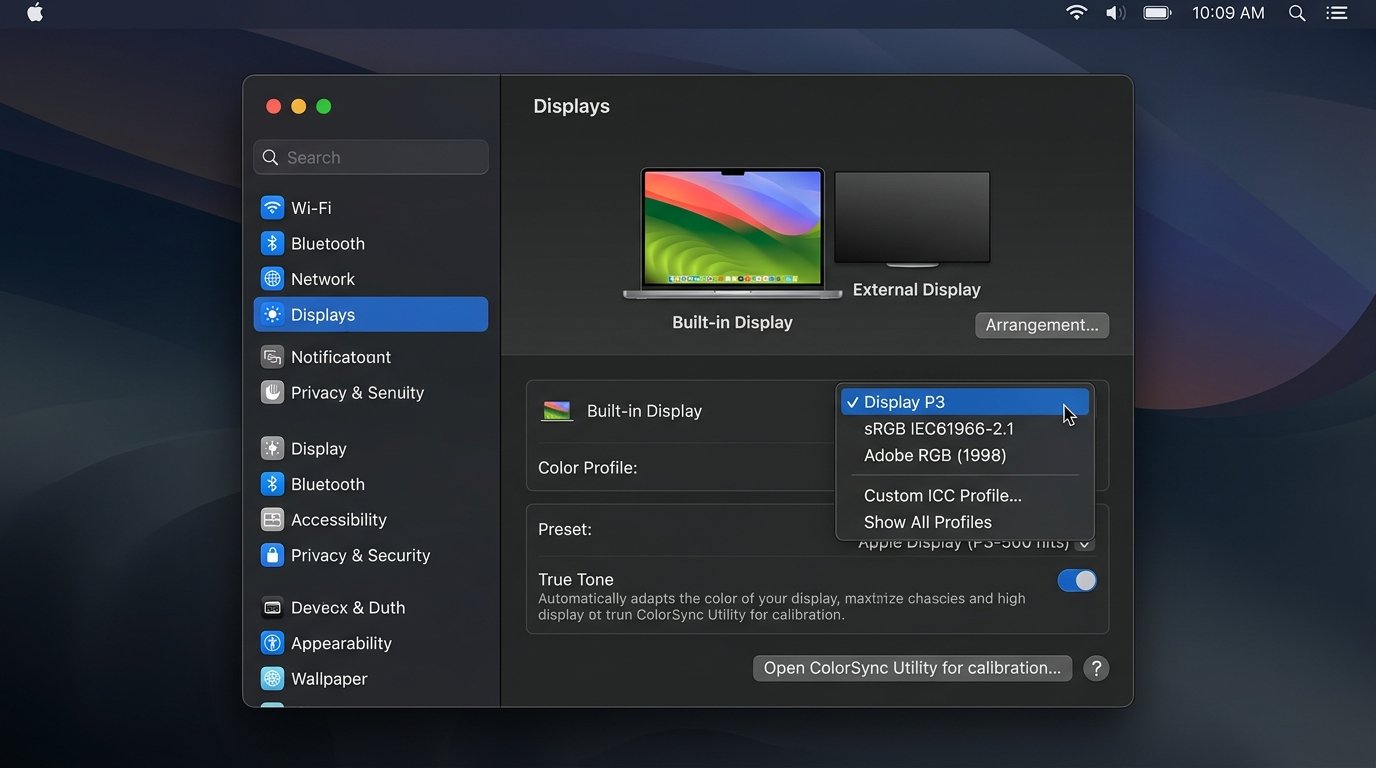
Configuring Color Profiles in macOS (Sonoma, Ventura & Sequoia):
- Click the Apple menu () in the top left corner and select System Settings.
- In the left sidebar, click Displays.
- If you have multiple displays connected, click on the thumbnail of the monitor you wish to configure.
- Locate the Color Profile dropdown menu. macOS displays recommended color profiles for your hardware (e.g., Display P3 for Apple built-in Retina screens and Studio Displays, or sRGB IEC61966-2.1 / custom profiles for external monitors).
- To view all profiles installed on your Mac, click the dropdown and choose Customize... or Show All Profiles.
- Toggle off True Tone and Automatically adjust brightness when performing color-critical work to prevent ambient room light from skewing screen color temperature.
Using Apple Display Calibrator Assistant:
On macOS, you can access the classic Apple Display Calibrator Assistant through the ColorSync Utility application:
- Press Cmd + Space, type
ColorSync Utility, and press Enter. - Click on the Devices tab in the top toolbar.
- Expand Displays and select your monitor from the device tree.
- Click Open Calibrator... to launch the step-by-step assistant.
- Enable Expert Mode to access individual multi-step gamma coefficient curves, native luminance matching, and target white point selection (target D65 / 6500K for standard web and photo editing).
- Save your calibrated profile with a descriptive name (e.g., Dell_U2723QE_D65_Custom).
7. How to Install an ICC Profile on macOS
On macOS, ICC profiles are organized in dedicated system and user library paths. Adding an ICC profile manually to ColorSync is simple:
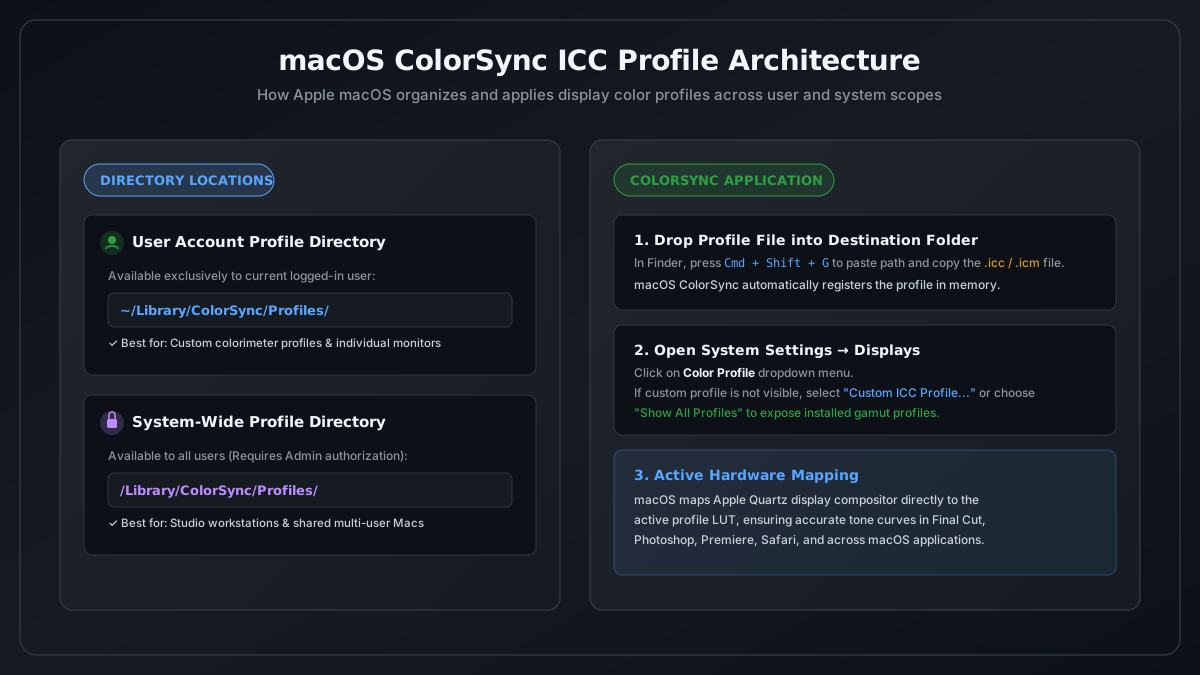
User Profile Directory (Recommended)
Available only to your user account without requiring administrator credentials:
~/Library/ColorSync/Profiles/
System Profile Directory
Available to all users on the Mac (requires admin password):
/Library/ColorSync/Profiles/
To quickly access your user library folder in Finder:
- Open Finder, press Cmd + Shift + G (Go to Folder), paste
~/Library/ColorSync/Profiles/, and hit Enter. - Drag and drop your
.iccor.icmprofile file into the folder. - Open System Settings > Displays > Color Profile. The profile will appear in the list ready for immediate selection.
8. Software Calibration vs. Hardware Calibration
When aiming for color accuracy, understanding the difference between software-based visual calibration and hardware colorimeter calibration helps determine which approach fits your workflow requirements.

| Feature | Software Calibration | Hardware Calibration |
|---|---|---|
| Measurement Method | Subjective visual inspection (Human eye) | Objective optical sensor (Colorimeter / Spectrophotometer) |
| Equipment Required | None (Built-in OS software) | USB Colorimeter (Datacolor Spyder, Calibrite Display Plus HL) |
| Color Accuracy (ΔE) | Approximate (ΔE typically > 3.0) | Reference Standard (ΔE < 1.0) |
| LUT Processing | 8-bit GPU LUT (May cause gradient banding) | 14-bit or 16-bit 3D LUT (Smooth tonal gradients) |
| Cost | Free ($0) | $150 to $300 (Colorimeter device) |
| Repeatability | Low (Varies with eye fatigue and lighting) | 100% Instrument-verified repeatability |
| Best Suited For | Casual users, office productivity, general viewing | Professional photographers, video colorists, print production |
Understanding Colorimeters and Spectrophotometers
A colorimeter (such as the Datacolor SpyderX/Pro or Calibrite Display Plus HL) uses optical glass filters and photodiodes to measure the red, green, and blue light emitted by your monitor. It connects via USB, hangs over the front panel, and flashes hundreds of standardized color patches. Software compares the measured light output against reference color standards and writes an ultra-precise ICC profile.
A spectrophotometer (such as the X-Rite i1Pro 3) goes a step further by measuring the full spectral wavelength distribution of light in 10-nanometer bands. Spectrophotometers are used in commercial print houses and industrial grading suites to calibrate wide-gamut OLED, mini-LED, and custom spectral backlights.
9. Common Monitor Calibration Mistakes to Avoid
Even with good calibration tools, common procedural errors can introduce severe color skew. Avoid these ten frequent mistakes:
⚠ 1. Brightness Set Too High
Setting brightness to 250–350 nits in a dim room causes severe eye fatigue and leads you to edit photos too dark, causing printed photos to appear muddy and underexposed.
⚠ 2. Calibrating with Night Light Active
If Windows Night Light, Apple Night Shift, or True Tone are enabled, your calibration will lock in an extreme blue compensation curve to combat the temporary yellow tint.
⚠ 3. Fluctuating Ambient Lighting
Calibrating next to a window with changing afternoon sunlight changes your visual perception of white. Use constant, controlled room illumination.
⚠ 4. Dynamic Contrast Left Enabled
Dynamic contrast continuously alters backlight intensity based on screen content, completely destroying calibrated gamma tracking.
⚠ 5. Modifying OSD Buttons Post-Calibration
Changing monitor hardware buttons (RGB gain, brightness, preset modes) after creating an ICC profile invalidates the profile's lookup table.
⚠ 6. Matching Dual Monitors Only by Eye
Human visual adaptation makes it impossible to manually align two side-by-side displays with different panel chemistries (IPS vs VA vs OLED) without a colorimeter.
10. How Often Should You Calibrate Your Monitor?
Display calibration is not a one-time setup. Over thousands of hours of operation, all display technologies experience physical component drift:
- LED Backlight Phosphor Aging: White LED backlights gradually lose blue spectral intensity and shift in color temperature over time.
- OLED Organic Subpixel Wear: Organic light-emitting diodes gradually decay at varying rates across red, green, and blue subpixel materials.
- Operating System & Driver Updates: Major Windows feature updates or clean GPU driver installations can reset the active ICC profile or GPU lookup table back to factory defaults.
Recommended Calibration Intervals:
- Professional Colorists & Prepress Editors: Every 2 to 4 weeks. Precision grading requires tight Delta E tolerances below 1.0.
- Photographers, Videographers & UI Designers: Every 1 to 2 months. Maintains consistent color across client deliverables.
- General Creators & Everyday Users: Every 3 to 6 months, or immediately following a major graphics driver update or monitor firmware flash.
11. How to Check Your Monitor After Calibration
Once your calibration is complete and your ICC profile is active, conduct a comprehensive visual verification test across key colorimetric targets:
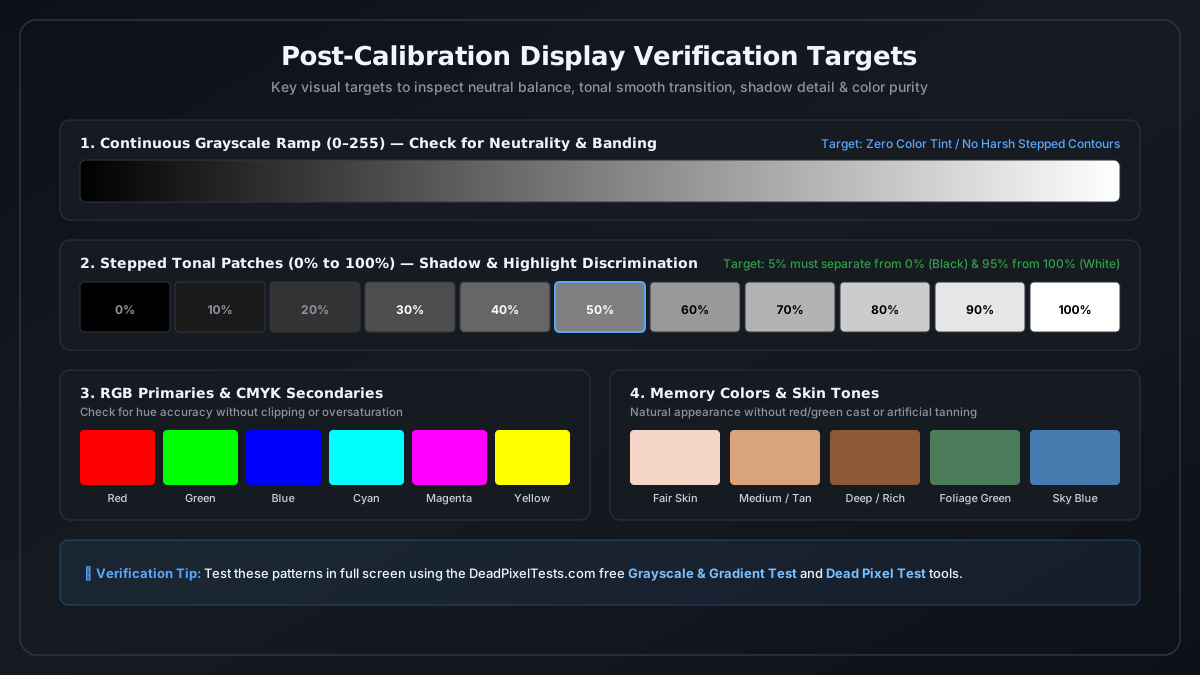
Key Visual Verification Steps:
- Continuous Grayscale Ramp (0–255): Open a fullscreen smooth gray gradient. The transition from black to white should be completely neutral with zero magenta, green, or cyan tinting across any tonal band, and without harsh stepped contour lines. Test this using our free Grayscale & Gradient Test.
- Near-Black Shadow Discrimination: Verify that 1%, 2%, and 5% dark gray patches are clearly distinguishable from a 0% pure black field. If they blend into black, your black level is crushed.
- Near-White Highlight Discrimination: Verify that 95%, 98%, and 99% light gray patches remain distinct from 100% pure white without highlight clipping.
- Memory Colors & Skin Tones: Inspect high-resolution reference portraits. Caucasian, Asian, and African skin tones should look organic, natural, and rich without artificial orange bronzing or sickly green undertones.
Distinguishing Color Calibration from Physical Panel Defects
It is crucial to remember that color calibration corrects software color translation and gamma tracking, but it cannot fix physical panel hardware flaws. To ensure your display is free of hardware defects, run DeadPixelTests.com's full suite of browser-based diagnostic utilities:
Dead Pixel Test →
Scan solid RGBW fields to detect unlit black subpixel transistors.
Stuck Pixel Test →
Inspect and stimulate locked primary color subpixels.
Backlight Bleed Test →
Identify physical bezel light leakage vs. normal IPS glow.
All-in-One Screen Test →
Run a complete display health audit across pixels, uniformity, and motion.
Test Your Monitor Health Today
Now that your monitor colors are accurately calibrated, ensure your display hardware is pristine. Run our complete suite of free, client-side diagnostic tests to check for dead pixels, stuck subpixels, backlight bleed, and grayscale uniformity.
12. Frequently Asked Questions
An ICC profile (.icc or .icm) is a standardized data file created by the International Color Consortium that describes the color reproduction characteristics, color gamut, white point chromaticity, and tone reproduction curve (gamma) of a specific display. Operating systems use it to translate digital color values into accurate physical light output.
Yes. Windows 11 includes the built-in Display Color Calibration wizard (dccw.exe), which allows users to visually adjust display gamma, brightness, contrast, and three-channel RGB color balance. Windows 11 also provides a modern HDR Calibration app available through the Microsoft Store for HDR displays.
To install an ICC profile in Windows 11, right-click the .icc or .icm file and select Install Profile. Then open Color Management (colorcpl.exe), select your target monitor, check Use my settings for this device, click Add..., choose the newly installed profile, and click Set as Default Profile.
On macOS, copy your .icc or .icm profile into ~/Library/ColorSync/Profiles/ (for the current user) or /Library/ColorSync/Profiles/ (system-wide). Then open System Settings > Displays, select your target display, and choose the profile from the Color Profile dropdown menu.
Yes, an ICC profile corrects software color translation, gamma tracking, and color temperature tints. However, an ICC profile cannot fix physical panel hardware flaws such as dead subpixels, severe backlight bleed, or hardware bit-depth clipping.
Yes. Hardware calibration using a colorimeter (such as a Datacolor Spyder or Calibrite Display Plus) physically measures the spectral light output from your screen, eliminating subjective human eye error and creating an objective, instrument-verified 3D LUT profile with Delta E below 1.0.
Creative professionals working in color grading, photography, and prepress should calibrate every 2 to 4 weeks. General content creators and designers should calibrate every 1 to 2 months. Casual users and gamers can calibrate every 3 to 6 months or whenever noticeable color drift occurs.
No. Even two identical monitors of the exact same model possess distinct factory panel revisions, backlight spectral outputs, and component aging. Loading a profile created on another unit will often introduce black crush, false color casts, or gradient banding.
Yes. Enabling HDR changes the display pipeline from gamma-based SDR (sRGB/Rec.709) to Perceptual Quantizer (PQ / SMPTE ST 2084) wide-gamut tone mapping. SDR color profiles do not apply correctly when HDR is active. Standard color-critical SDR work should be calibrated and evaluated with HDR disabled.
Yes. Gaming monitors frequently ship from the factory with aggressive showroom presets, boosted blues (high color temperature), and elevated gamma designed for high contrast in games. Calibrating neutral 6500K white point and 2.2 gamma ensures accurate rendering and reduces visual fatigue.